Roasting Overview
Table of Contents
Roasting with Bellwether Video
Turning Your Roaster On and Off
Signing In and Connecting
Roast Screen Overview
Starting Your Roast
The Checklist Screen
Your Pre-roast Checklist
Pre-heating Screen
Turning Your Roaster On and Off

Turn your roaster on by opening the white panel found in the lower left quadrant of the roaster. This is the same panel that houses the chaff collector and water reservoir. Here’s how:
- Turn the start dial one click to initiate standby (I)
- After 3 seconds, turn the dial all the way to the right/clockwise to START
- You will feel and hear the roaster turn on, at which point you can release the knob, which will return to the (I) position
To turn off, turn the knob all the way to the left/counterclockwise (O) Be sure to turn off your roaster at the end of each roast day.
Signing In + Connecting
- Turn on your iPad and sign in to the Bellwether App. Make sure you’re connected to the internet by locating the connectivity icon in the app’s upper-righthand corner.
While the iPad is seeking connection, you will see a red dot hovering above this icon. When the red dot disappears, and the icon is clear, this means you are connected and ready to roast!
For connectivity troubleshooting, please check out our iPad + Connectivity Troubleshooting article here.
Note: the iPad must be plugged into the roaster to start a roast, and must remain plugged in while roasting.
- In your Green inventory tab, click on the purple section of the tile for the desired coffee you’d like to roast and you’ll be taken to the roast screen.
Once there, select the Roast Profile you’d like to use. If you’re using a coffee from the Bellwether Marketplace, you’ll be provided with 4 expertly crafted profiles to use!
Roast Screen Overview

Roast profiles:
The coffee’s roast profiles are located on the left side of the screen. This is where you will see the roast profiles for the coffee you’ve selected.
You can also create a new custom profile by tapping on + Create new profile. Please see Creating + Editing Roast Profiles to learn more!
Prepare:
Takes you through a guided step-by-step process for starting a roast.
Schedule:
Allows you to schedule a roast for later.
Edit:
Allows you to edit the selected roast profile.
Please see Creating + Editing Roast Profiles to learn more!
Duplicate:
Duplicating is useful if you would like to keep the original profile, but want to edit a new version.
Copy to:
Allows you to copy* this profile to another coffee in your green inventory.
*Please note, Bellwether Profiles can only be copied to coffees from the Bellwether Marketplace.
Starting Your Roast
Once you have selected your desired roast profile, click Prepare to get the profile loaded and ready for the Checklist Screen.
Checklist Screen

Once you have selected the profile you wish to roast, you will be taken to a Pre-roast and status checklist. This will help to ensure that you have done all the tasks before you roast. The name of the bean and the profile you are roasting will be at the top of the screen as a reminder. The question mark icon will assist you in knowing what each function is in case you forget. Just click on the “?” icon to get more information.
Here you will see two columns, Your pre-roast check, and Roaster pre-roast status.
Please note, The Pre-roast checklist boxes are actionable items for you to perform before you start your roast.
If you have completed the items in the Pre-roast checklist, the Roaster pre-roast status will automatically turn green and you will be able to start roasting.
You Pre-Roast Checklist
On the left, you will have a pre-roast checklist that you will select manually as you complete each task. If you are on this screen then the first two boxes on the left under pre-roast check will be checked automatically.
If a maintenance task is required the box will not auto-select and you will need to perform the task before moving forward.
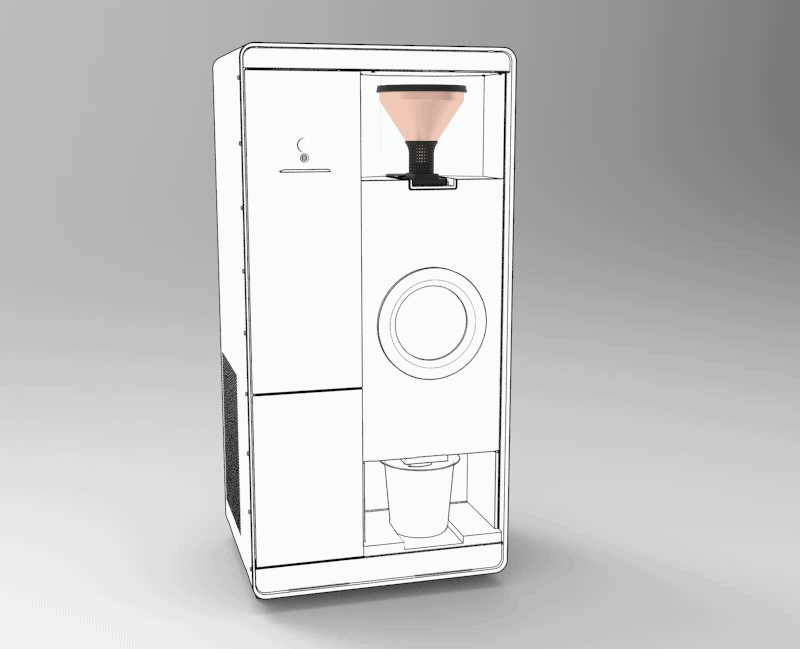
- Remove the hopper from the roaster by sliding it out of the track towards yourself and place it on a clean, flat surface
- Add exactly 6 pounds of your chosen green coffee
- Secure the rubber lid back on top of the hopper. Run your hand along the top of the hopper lid. You will hear/feel it click, indicating it is sealed. This is important to ensure a consistent roast!
- Slide the hopper back into place until you hear and feel it latch into the roaster
- Place an empty Bellwether Bucket in the bucket cubby below the roasting drum.
Pre-Roast Status:
On the right, you will be ready to roast once all of the circles are green.
Tap on Start Roast to begin roasting.
Preheating Screen

You will see a preheating screen that lets you know how many minutes remaining until the roast drops into the drum and begins to roast.
Please note, this could take up to 20 minutes if it is your first roast of the day.